SQL Server - SQL Server Management Studio (SSMS)

SQL Server - SQL Server Management Studio (SSMS)

SQL Server Management Studio is the main administration console for SQL Server. It allows you to create and administer databases, security, replication, backups, and more.
There are many ways to connect to SQL Server. The method you use will depend on your environment, and where you're connecting from. For example, you can connect via a web application, an online admin tool, via a command line utility, or via SQL Server Management Studio.
SQL Server Management Studio (SSMS) is a graphical admin tool that allows you to perform all sorts of tasks with SQL Server. You can create and manage databases, create user accounts, configure advanced security options, schedule regular backups, and more.
SSMS also provides Transact-SQL, MDX, DMX, and XML language editors for editing and debugging scripts.

Getting Started with SQL Server Management Studio

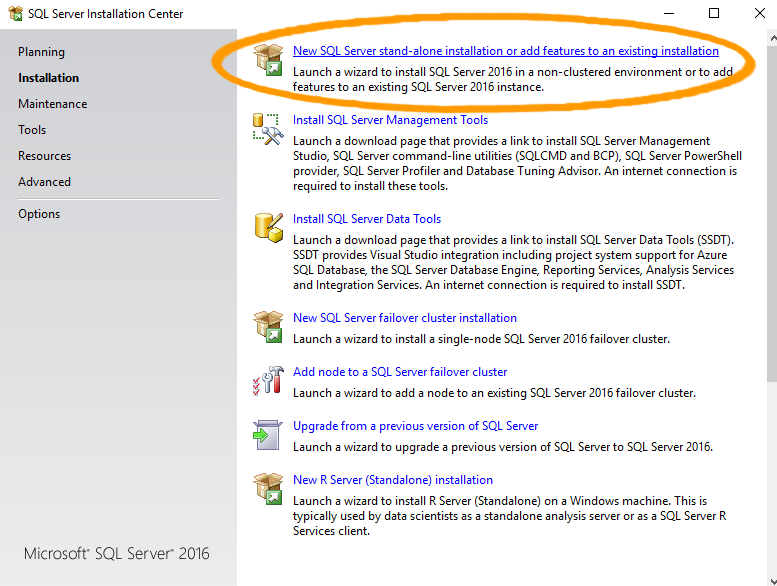
Despite the many steps involved in installing SQL Server, none of those steps involved installing SQL Server Management Studio.
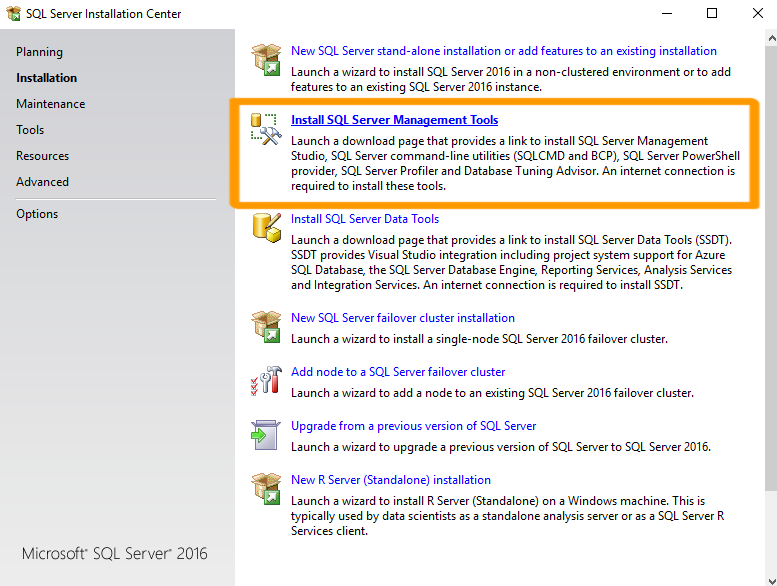
In earlier versions of SQL Server, you could select SQL Server Management Studio (SSMS) as an option in the installation wizard, but this is not the case with SQL Server 2016. So we must install SSMS separately.
Here's how to get started with SSMS.
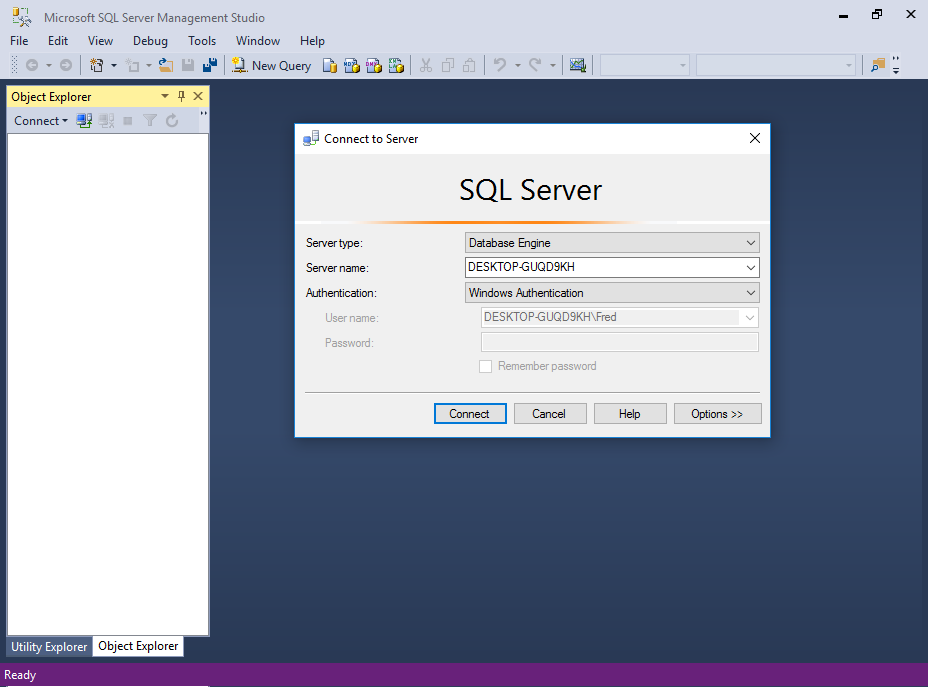
  1. Install SSMS

    Screenshot of the Installation Center.
    You can install SSMS from the same SQL Server Installation Center that you used to install SQL Server.
    Ensuring that Installation is selected in the left menu, select Install SQL Server Management Tools and follow the prompts.
    This actually downloads SSMS before installing it. So it can take some time.
    Here are the screenshots if you need them.
    You can also download SSMS from the Microsoft website if you need to.
  2. Open SSMS

    Screenshot of the Program Files in Windows.
    You can now open SQL Server Management Studio by finding it in your Windows apps list.
    It is located under Microsoft SQL Server 2016.
    Depending on your operating system, you could also type SSMS into the Start Page and it should pop up.
  3. Connect to SQL Server

    Screenshot of connecting to SQL Server.
    SSMS will prompt you to connect to SQL Server.
    Select the server type, server name, and the authentication details and click Connect.

The SSMS Interface

Here's a quick overview of the SQL Server Management Studio interface.
  • The Object Explorer

    Screenshot of SSMS.
    Once successfully connected to a server, you will see the server's objects displayed in the Object Explorer on the left.
    Object Explorer is a tree view of all the database objects in a server. This can include the databases of the SQL Server Database Engine, Analysis Services, Reporting Services, and Integration Services.
  • Document Windows

    Screenshot of SSMS.
    The large area to the right of the Object Explorer is allocated to document windows. This area can contain query editors and browser windows. Its contents depend on the current context.
    For example, clicking on New Query in the toolbar will add a new query window, so that you can enter a query. Opening a table in Design view will display the table's fields and their properties. And clicking View Help will open a browser window with SQL Server 2016 Technical Documentation from MSDN.
  • Other Windows

    Screenshot of SSMS.
    Various other windows and wizards are available in SSMS.
    For example, the Registered Servers window lists the servers that you manage frequently.
    The Properties window describes the state of an item in SQL Server Management Studio, such as a connection or a Showplan operator, and information about database objects such as tables, views, and designers.
    Many properties are read-only in the Properties window but can be changed elsewhere in the Management Studio.

Servers and Databases

You can use SQL Server Management Studio to create as many databases as you like. You can also connect to as many databases on as many servers as you like. These all appear in the Object Explorer.
So you could run a query on your development environment, then switch to your test or production environment and run a query there. Because of this, you need to be careful that you don't accidentally run a script against the wrong server.
Most of the tasks performed with SQL Server Management Studio are initiated either from the top menu, or by right-clicking on an icon/object.
SQL Server - Install

SQL Server - Install

SQL Server 2016 can be installed with the SQL Server Installation Wizard, which allows you to install all SQL Server components in one go.
If you don't have a copy of SQL Server 2016, you can download the installation files from the Microsoft website. The Express edition is a free download, as is the Developer edition.
The examples in this tutorial are all done using the free Developer edition. You'll need to become a Visual Studio Dev Essentials member first (if you're not already a member). If you don't want to become a Visual Studio Dev Essentials member, you can download the free SQL Server 2016 Express edition without that requirement.
Here's a high level overview of the steps required to download and install SQL Server 2016.
  1. Download SQL Server

    Screenshot of the Microsoft Website download area.
    Download SQL Server from the Microsoft website.
    For a free download, choose either the Express or Developer edition.
    Choosing the Developer edition will direct you to the Visual Studio Dev Essentials website. You will need to log in or become a member in order to download SQL Server Developer edition.
    Membership is free, and you get access to other free downloads too.
    If you don't want to become a Visual Studio Dev Essentials member, download the free SQL Server 2016 Express edition.
  2. Launch the SQL Server Installation Center

    Screenshot of the installer file.Screenshot of the security message.
    Once the package has downloaded, open the folder in the File Explorer and double-click Setup to launch the SQL Server Installation Center.
    Click Yes if you get a security message asking if you want the app to make changes to your PC.
  3. Start the Installation

    Screenshot of the Installation Center.
    The SQL Server Installation Center will now open.
    Ensuring that Installation is selected in the left menu, click the first option, New SQL Server stand-alone installation or add features to an existing installation to start the installation process.
    This will open an installation wizard that guides you through the process.
  4. Complete the Installation

    Screenshot of the Installation Complete message.
    Continue through all steps of the installation wizard.
    Once the installation is complete, a screen will show that it has completed successfully.
    Click Close.

More Screenshots

Check out SQL Server 2016 Installation with Screenshots for a step-by-step guide through the installation wizard, complete with screenshots.

New Installer

There's a new installer that makes installation much easier. Using this installer, a basic installation can be done in 3 clicks (although a customized install will require more steps).
If you see this option on the download page, feel free to use it instead of the steps above.
Screenshot of the new installer.
SQL Server - Introduction

SQL Server - Introduction

Microsoft SQL Server is a Relational Database Management System (RDBMS) developed by Microsoft. It is a highly scalable product that can be run on anything from a single laptop, to a network of high-powered cloud servers, and anything in between.
Of course, by "anything", it still needs to satisfy the usual hardware and software requirements, but these requirements are reasonably modest, considering what SQL Server is capable of.
According to Microsoft, SQL Server is the number 1 most-used database in the world. According to various other sources, it's more like number 2, 3, or 4. In any case, it's one of the most popular database management systems in the world.
Since the release of SQL Server 1.0 in 1989, SQL Server has evolved to become a true, enterprise information platform. While it's core function is that of an RDBMS, SQL Server has become much more than that. SQL Server 2016 includes built-in business intelligence tools, as well as a range of analysis and reporting tools. This is on top of the database management tools such as database creation, backup, replication, security, and more.
This tutorial focuses more on the database management tools.

Database Management Tools

SQL Server comes with a number of tools to help you with your database administration and programming tasks.
Some typical database administration and programming tasks could include:
  • Create & maintain databases
  • Create & maintain tables
  • Create & maintain other database objects such as stored procedures, views, etc
  • Create & maintain and schedule data backups
  • Replication (eg, create a copy of the database)
  • Create & maintain users, roles, etc
  • Optimization tasks
These are some of many tasks that a database administrator (DBA) might need to perform. SQL Server provides the means for performing these tasks.

Client/Server Database Systems

SQL Server is a client/server DBMS, as opposed to a desktop system such as Access.
Client/server systems are designed to run on a central server - or servers - so that multiple users can access the same data simultaneously from across a network. Users normally access the database through an application.
For example, a web-based corporate CRM could be used by employees in various cities, or even countries, all reading and updating data via their browser.
Generally, it's the CRM application that provides the functionality to these users (for example, the CRM could be built using say, ColdFusionHTML, and JavaScript). It is the database that stores the data and makes it available. However, SQL Server does include some useful features that can assist the application in providing its functionality.
Other client/server databases include MySQL, Oracle, and PostgreSQL, to name a few.

SQL Server 2016 Enhancements

SQL Server 2016 includes a number of enhancements from its predecessor, SQL Server 2014. It would probably take a whole new tutorial to list them in detail, but in a nutshell, the improvements in SQL Server 2016 over 2014 include:
Better security
With Always Encrypted, Row-Level Security, and Dynamic data masking
Higher availability
Including AlwaysOn Availability Groups, Cloud Witness, Storage Spaces Direct, Workgroup clusters
Improved database engine
TempDB enhancements, Query Store, Stretch Database,
More analytics
Tabular enhancements, R integration)
Various improvements to reporting
Search, custom branding, optimization for modern browsers, mobile, etc

SQL Server 2016 Editions

SQL Server 2016 comes in five editions:


  • Enterprise
  • Standard
  • Developer
  • Web
  • Express
CSS - How to add CSS to a Webpage

CSS - How to add CSS to a Webpage

When it comes to adding CSS to your document, you have a choice of methods. However, one method stands out as the most common.
There are 4 ways of adding CSS to a webpage: declare inlineembed into the head of your document, link to an external CSS file, import a CSS file.
  • Inline Styles

    With inline styles, style sheet information is applied directly to the HTML element. Instead of defining the style once, then applying the style against all instances of an element (say the <p> tag), you add the style directly to the specific element you want the style to apply to.
    For example:
    <p style="color:olive;font-size:24px;">HTML Styles with CSS</p>
    While inline styles can be a quick and convenient way to add styles to an HTML document, this method should be used sparingly.
    Adding inline styles all over a website can make it much more difficult to maintain. A small change can become a major undertaking if the style has been applied to many pages across the site.
  • Embedded Styles

    You add all CSS information to one part of the document (usually the top). This allows you to style any element on the page from a single place. You do this by embedding the CSS information within <style>tags in the head of your document.
    For example, place the following code between the <head> tags of your HTML document:
    <style>
        body {
            background-color: darkslategrey;
            color: azure;
            font-size: 1.1em;
        }
        h1 {
            color: coral;
        }
        #intro {
            font-size: 1.3em;
        }
        .colorful {
            color: orange;
        }
    </style>
    Here's an example of where that code fits in to an HTML document:
    <!DOCTYPE html>
    <html>
        <head>
            <title>My Example</title>
            <style>
                body {
                    background-color: darkslategrey;
                    color: azure;
                    font-size: 1.1em;
                }
                h1 {
                    color: coral;
                }
                #intro {
                    font-size: 1.3em;
                }
                .colorful {
                    color: orange;
                }
            </style>
        </head>
        <body>
            <h1>Embedded Styles</h1>
            <p id="intro">Allow you to define styles for the whole document.</p>
            <p class="colorful">This has a style applied via a class.</p>
        </body>
    </html>
  • External Styles

    External style sheets are the most common method of applying styles to a website. Most modern websites use an external stylesheet to apply site-wide styles to the whole website.
    External styles refer to creating a separate file that contains all style information. This file is then linked to from as many HTML pages as you like. This will often be the whole website.
    To add an external stylesheet to a web page, use the <link> tag, providing the URL of the style sheet in the href attribute, as well as rel="stylesheet".
    For the following example, I've taken the styles from the above (embedded) example, moved them to an external style sheet, then linked to that file.
    <!DOCTYPE html>
    <html>
        <head>
            <title>My Example</title>
            <link rel="stylesheet" href="/css/tutorial/example.css">
        </head>
        <body>
            <h1>Embedded Styles</h1>
            <p id="intro">Allow you to define styles for the whole document.</p>
            <p class="colorful">This has a style applied via a class.</p>
        </body>
    </html>
    So, you can see that the HTML file no longer contains any actual CSS code. The CSS code is located in the external file.
  • Import Styles

    You can also use the CSS @import rule to import an external style sheet.
    To do this, use the <style> tag.
    You can use either of the following syntaxes:
    <style>
        @import "imported_style_sheet.css";
        @import url("imported_style_sheet.css");
    </style>
    Here, we use the same style sheet as in the previous example, but this time we use the @import rule to import the style sheet.
    <!DOCTYPE html>
    <html>
        <head>
            <title>My Example</title>
            <style>
                @import "/css/tutorial/example.css";
            </style>
        </head>
        <body>
            <h1>Embedded Styles</h1>
            <p id="intro">Allow you to define styles for the whole document.</p>
            <p class="colorful">This has a style applied via a class.</p>
        </body>
    </html>
    Note that this method can affect performance and it's often more efficient to use the first method (i.e. with the <link> tag).
    However, the @import rule can also be used from within the external style sheet itself (in order to import another style sheet into that one) without incuring the same performance issues.
You're not limited to just one method of applying styles to a document. You can combine all three methods if required.
Most modern websites use external styles for most (if not all) of their styles.


However, there are many valid reasons why they might also need to use one or both of the other methods.
CSS Syntax — How to Code CSS

CSS Syntax — How to Code CSS

This page describes the basic syntax that that you can use to apply CSS to any website.
The CSS syntax consists of a set of rules. These rules have 3 parts: a selector, a property, and a value.
You don't need to remember this in order to code CSS. Once you start coding CSS, you'll do so without thinking "this is a selector" or "that is a property". This should begin to make sense once you study the examples on this page.
Syntax:
selector { property: value }
The selector represents the HTML element that you want to style. For example:
h1 { color: blue }
This code tells the browser to render all occurences of the HTML <h1> element in blue.

Grouping Selectors

You can apply a style to many selectors if you like. Just separate the selectors with a comma.
h1,h2,h3,h4,h5,h6 { color: blue }

Applying Multiple Properties

To apply more than one property separate each declaration with a semi-colon.
h1 { color:blue; font-family:arial,helvetica,"sans serif" }

Readability

You can make your CSS code more readable by spreading your style declarations across multiple lines. You can also indent your code if you like. This doesn't affect how your code is rendered - it just makes it easier for you to read.
h1 {
 color:blue;
 font-family:arial,helvetica,"sans serif";
 font-size:150%;
}
OK, so you've now learned about the CSS syntax. But how do you incorporate this syntax into your website? The next lesson will show you how to incorporate CSS into your HTML documents.
CSS - Introduction

CSS - Introduction

Here, we'll look at what CSS actually is, and why it's a perfect fit for HTML.

What is CSS?

CSS stands for Cascading Style Sheets. CSS is the standard language for defining styles on web pages. Although CSS is more widely known for its application in HTML documents, it can be used for defining styles for any structured document format (such as XML for example).
Styles are set using CSS properties. For example, you can set font properties (size, colors, style etc), background images, border styles, and much more.

CSS History

CSS has gone through some major changes since CSS level 1 became a W3C recommendation in December 1996. CSS1 describes the CSS language as well as a simple visual formatting model. CSS2, which became a W3C recommendation in May 1998, builds on CSS1 and adds support for media-specific style sheets (e.g. printers and aural devices), downloadable fonts, element positioning and tables.
As of this writing, CSS3 is currently under development, and includes more advanced features such as animations, background gradients, multi-column layouts, border images, and more.

HTML vs CSS

It's not really "HTML vs CSS". In fact HTML and CSS are the best of friends! CSS is a supplementary extension to HTML. Here's what each does:
HTML
The purpose of HTML is to provide document structure and meaning. This is particularly true with the introduction of HTML5. You use HTML to specify what elements go on the page (eg, headings, paragraphs, tables, images, etc). Each of these elements (as well as their attributes and attribute values) have a certain meaning.
CSS
You use CSS to specify how those HTML elements look. But not just how they look, how they are presented. After all, you can use CSS to provide styles for speech output (for example, for users using a screen reader). So, you can write an HTML document without being concerned with its presentation, then use CSS to specify how it will be presented within any given context. Not only this, but you can change the CSS without having to change the HTML. In other words, you can "plug" a style sheet into an HTML document and the HTML document will immediately take on the styles of that style sheet.
All we did was add the following code to the second example:
<style>
main {
  width: 200px;
  height: 200px;
  padding: 10px;
  background: beige;
  }
h1 {
  font-family: cursive;
  color: olivedrab;
  border-bottom: 1px dotted darkgreen;
  }
p {
  font-family: sans-serif;
  color: orange;
  }
</style>
Go ahead and "cut & paste" the <style> tags and everything between them from the second example into the first example to see how it affects both examples.
So yes, you could create an HTML document without CSS, but it will probably look like it was created back in 1995!
Next we'll look at the CSS syntax.